原神 では、ボナが Chu'ulel ライト コアから深淵の腐敗を浄化するのを支援した後、プレイヤーは彼女が炎の原初を見つけるのを手伝う必要があります。 発見したら、トラベラーは 2 つのピロフォスフォライト (パレス オブ ザ ビジョン サーペント クエスト中に入手) を炎の原初の祭壇に捧げなければなりません。
この製品は、オッカナトランの儚い夢のゆりかごの上に浮かぶ浮島、トナティウへの道を開きます。 Tonatiuh に到達すると、To the Sky-Road クエストが完了し、The Other Side of the Sky クエストが始まります。これにより、旅行者は、帰還の翡翠を獲得するために 4 つの燃える火の石を集める必要があります。
4つの燃える火の石を入手する:
バーニングファイアストーン #1
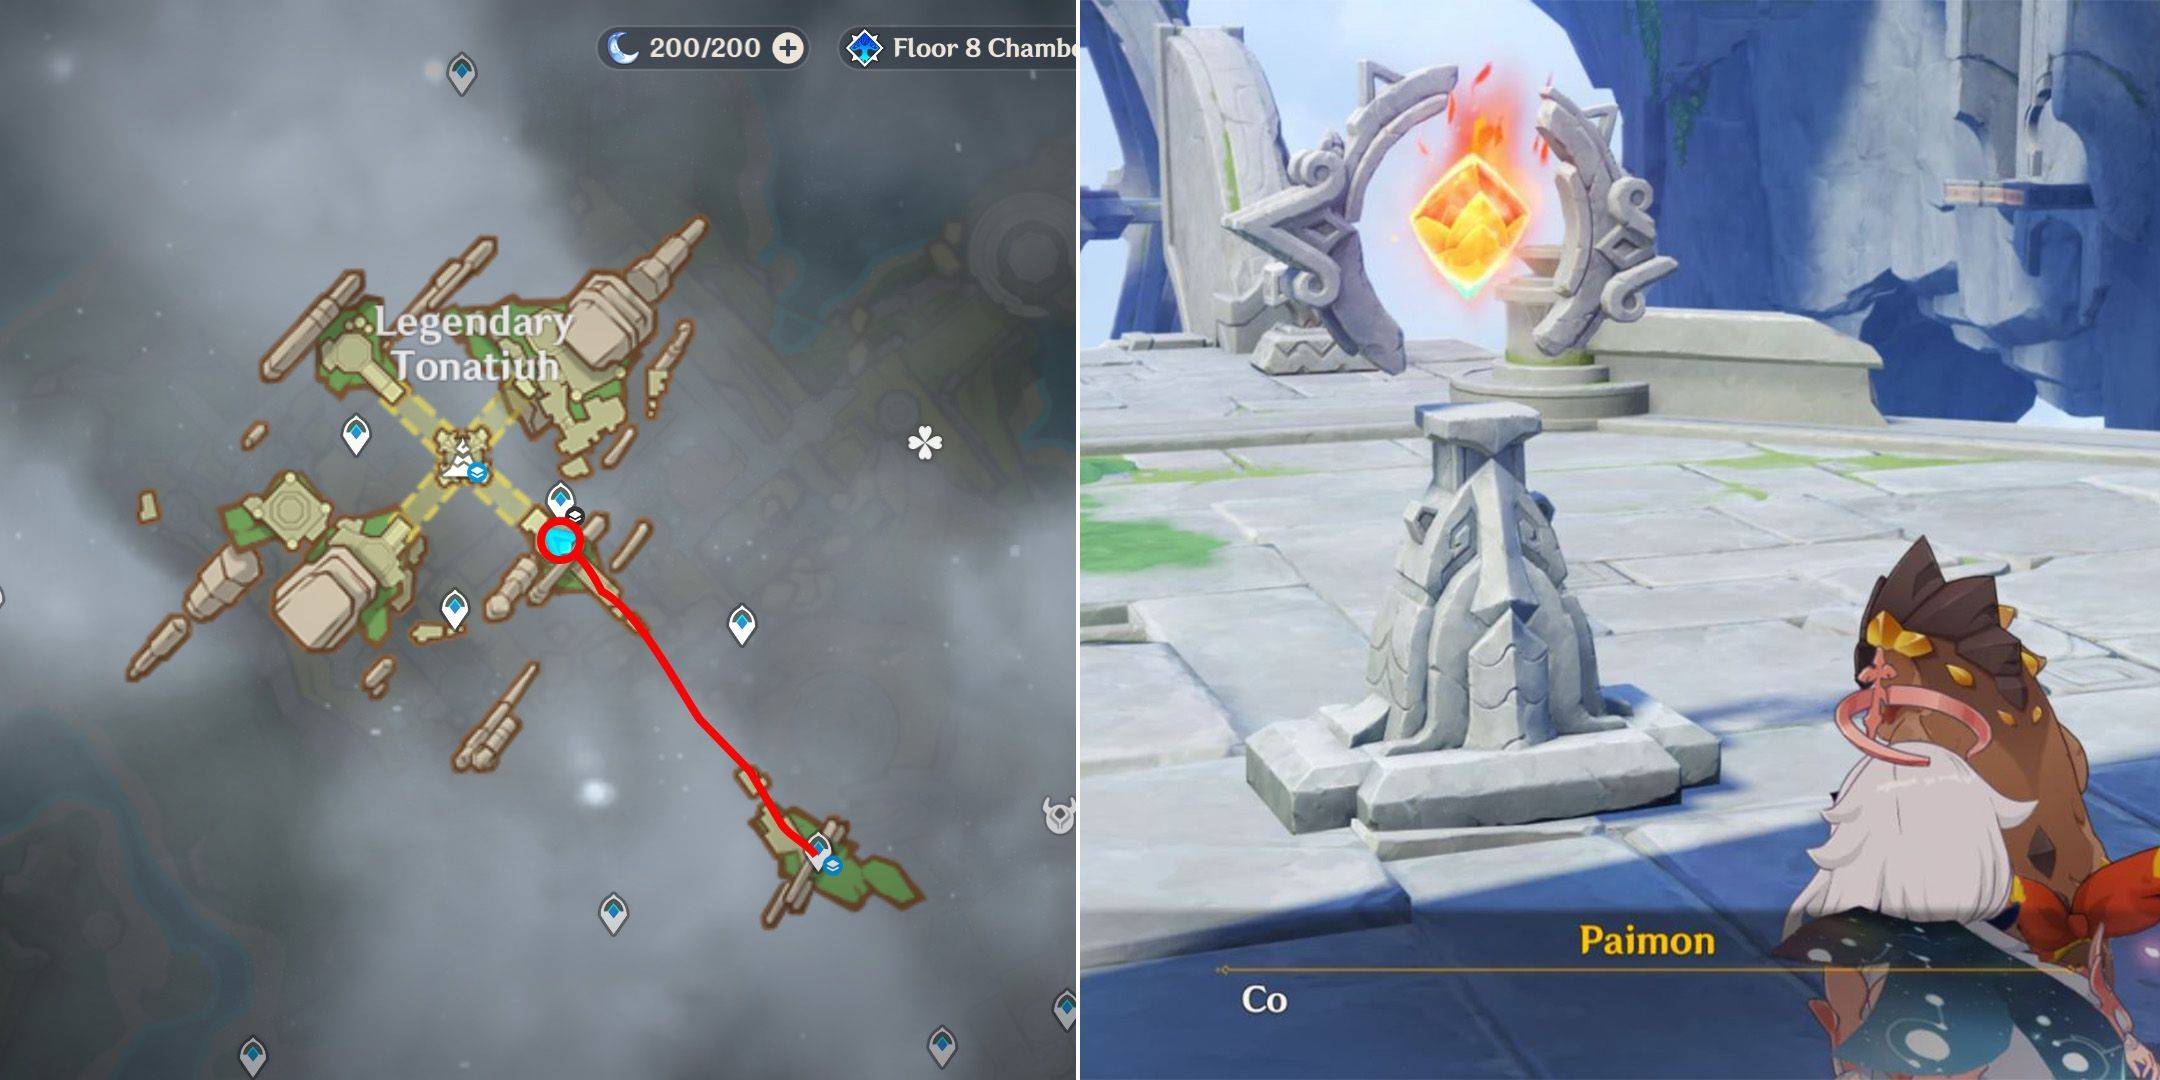
最初のファイアストーンは、Bona のカットシーン後に自動的に取得されます。 リトル・ワンを追って橋を渡って(必要に応じてリフト機構を作動させて)、サウリアンとボナと対話します。
バーニングファイアストーン #2
2 番目のファイアストーンは北東の島にあります。 これには、浮島のメカニズムを操作し、橋を渡り、リフトを作動させ、敵を倒すことが含まれます。 途中で宝箱を忘れずに集めてください。 最後に、小さな子と一緒に祭壇に戻ります。
バーニングファイアストーン #3
3 つ目のファイアストーンを入手するには、島のメカニズムを操作して北の島の下層に到達します。 リトルワンの後を追って、センチネルの行動を観察してください。 ククサウルスを利用してファイアストーンに到達し、メカニズムをアクティブにして祭壇に戻る必要があります。
バーニングファイアストーン #4
最後のファイアストーンは北西の島の上層にあります。 ボナの助けを借りて島に到達し、リフトを作動させ、小さな者を追って祭壇まで戻ります。 遭遇した敵をすべて倒します。祭壇に到達する前にプレシャスチェストを集めてください。
4 つのファイアストーンをすべて祭壇に捧げると、The Flowing Primal Flame クエストが完了し、Jade of Return が Golden Entreaty に変わります。 カットシーンが続き、流灰の街のドラゴンが紹介されます。 引き続きNursery of Nightmares島に行き、The Other Side of the Skyクエストを完了し、50プリモジェムを受け取ります。
Welcome to the Destiny Rising Gacha Guide – your ultimate resource to understand how the gacha system works, including summons, pity mechanics, and rate-up banners. Whether you're a new player or trying to optimize your pulls, this guide breaks down everything you need to know to make informed decisions.
🔑 1. Understanding Destiny Rising’s Gacha System
Destiny Rising uses a standard gacha model common in mobile RPGs, featuring:
Standard Banner (Normal Summon) – For non-rate-up characters.
Rate-Up Banner (Special Summon) – Features 5-star (★★★★★) characters with higher drop rates.
Pity System – Ensures you don’t get "lucked out" forever.
Guarantee Mechanics – Critical to maximizing value.
🎯 2. Summon Mechanics: How It Works
✅ Single Summon (1x Summon)
Cost: 120 Stamina (or 60 Gems, depending on currency used)
Result: 1 random character (or weapon) from the current banner.
5-star (★★★★★): 0.6% base chance (on standard banners).
4-star (★★★★): 5.1% base chance.
3-star (★★★): 94.3% base chance.
💡 Note: On rate-up banners, the 5-star rate for specific characters increases dramatically.
🔥 3. Rate-Up Banners: The Key to Getting Your Favorite Character
🎁 What Is a Rate-Up Banner?
A limited-time banner that boosts the drop rate of 1–2 specific 5-star characters.
These characters have a higher base chance (e.g., 1.5%–2.0%) vs. the standard 0.6%.
📌 Example:
Banner Name: “The Eternal Guardian – Althea” (Rate-Up)
Rate-Up 5-Star: Althea (★★★★★)
Rate-Up Chance: 2.0% (vs. 0.6% standard)
Other 5-stars: Still possible, but less likely.
✅ Pro Tip: Always check the banner details before pulling — only the rate-up characters are boosted.
🧩 4. Pity System: Your Safety Net
Destiny Rising uses a pity system to prevent endless bad luck. Here’s how it works:
🌟 Pity 1: 5-Star Guarantee
After 90 summons without a 5-star, the 91st summon is guaranteed to be 5-star.
This is true for all banners (standard or rate-up).
Pity is not reset by switching banners.
⚙️ Pity 2: Rate-Up Guarantee (Pity 2)
After 70 summons without a rate-up 5-star, the next 5-star (on a rate-up banner) is guaranteed to be the rate-up character.
This means:
If you’ve pulled 70 summons and haven’t gotten the rate-up 5-star, your next 5-star will be them.
Pity 2 does not apply on standard banners.
✅ Why It Matters:
Rate-up banners are worth waiting for to avoid wasting summons.
If you’re after a specific 5-star, wait until pity 2 kicks in.
📊 5. How to Use Pity & Rate-Up Strategically
✅ Best Pulling Strategy (For Rate-Up Characters)
Step
Action
1
Start pulling on a rate-up banner.
2
Track your summons.
3
At 70 summons, you’re guaranteed to get the rate-up 5-star on your next 5-star pull.
4
At 90 summons, you’re guaranteed a 5-star, regardless of type.
5
Pull until you get the rate-up 5-star, or accept it at 90 if you’re not aiming for it.
❌ Common Mistakes to Avoid
Pulling on a non-rate-up banner just to "save" pity (it doesn’t help).
Assuming rate-up increases apply to all 5-stars (they only boost the highlighted ones).
Forgetting that pity carries over between banners.
💰 6. Currency Management: Gems, Stamina, and Events
🪙 Stamina (Free Daily)
Max: 300
1 summon = 120 stamina
You can do 2 full 10-pull sets (20 summons) per day.
Not enough for 90-pull pity run → use gems for bulk.
💎 Gems (Paid)
Best for full 90-pull pity runs.
10-pull = 600 gems (standard cost)
10-pull bundles often offer discounts.
💡 Tip: Wait for free 10-pull events or double-gem days to maximize value.
🎁 7. Bonus: Events & Free Pulls
Welcome Events: 10 free summons for new players.
Anniversary/Seasonal Events: Free 10-pull banners or extra pity.
Special Promotions: Guaranteed 5-star on first 50 pulls (check official Discord/website).
📢 Always check official channels for limited-time offers.
✅ Final Tips: How to Win the Gacha
Always use rate-up banners when targeting a 5-star.
Wait until 70 summons on a rate-up banner to guarantee your target.
Track your summon count with a spreadsheet or app.
Avoid pulling on standard banners unless you’re okay with a random 5-star.
Use gems wisely — save for full 90-pull runs or guaranteed 5-star events.
🎉 Summary
Feature
Details
5-Star Base Chance (Standard)
0.6%
5-Star Rate-Up Chance
1.5%–2.0% (for selected characters)
Pity 1 (5-star guarantee)
90th summon
Pity 2 (Rate-Up guarantee)
70th summon on rate-up banner
Best Strategy
Pull on rate-up banner → wait for pity 2 or 90-pull
🎯 Remember: The gacha is luck-based, but pity and rate-ups make it fair. Use the system, not fight it.
Good luck, summoner! May the stars guide your pulls.
✨ “Destiny Rising isn’t just about luck — it’s about timing, strategy, and knowing when to pull.”
📌 Need help tracking pity? Use a free gacha tracker app like:
Gacha Tracker (iOS/Android)
Google Sheets template (search “Destiny Rising Gacha Tracker”)
Let me know if you want a custom spreadsheet template or help choosing your next rate-up banner! 🎮