Событие Genshin Impact версии 5.2 «Упражнение «Буря шторма», часть второй фазы», поначалу кажется сложным, но, как только оно будет понято, представляет собой простое событие в стиле тактической ролевой игры. Он предлагает значительные награды, в том числе Primogems, что делает участие стоящим. Вот руководство по участию и наградам.
Упражнение «Нарастающий шторм»: требования к участию в мероприятии
Чтобы присоединиться, вам необходимо:
- Ранг приключений 20 или выше.
- Завершение пролога квеста Мондштадтского архонта.
Начните мероприятие в штаб-квартире рыцарей Фавония в Мондштадте.

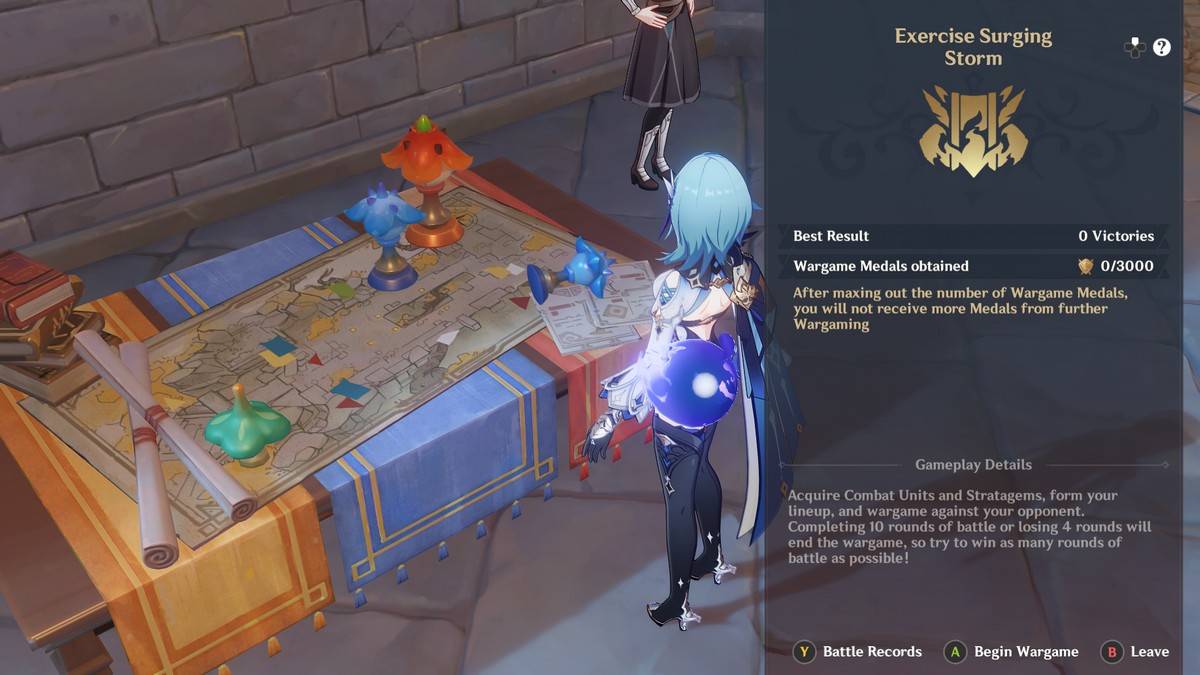
Обзор игрового процесса
На мероприятии представлены обучающие материалы, объясняющие механику. Вот краткое описание:
Перед каждой военной игрой выбирайте боевые юниты (войска) и стратегемы (усиления). У юнитов есть типы (урон по площади, полет, дальний бой, ближний бой) с сильными и слабыми сторонами (например, счетчики ближнего боя дальнего боя).

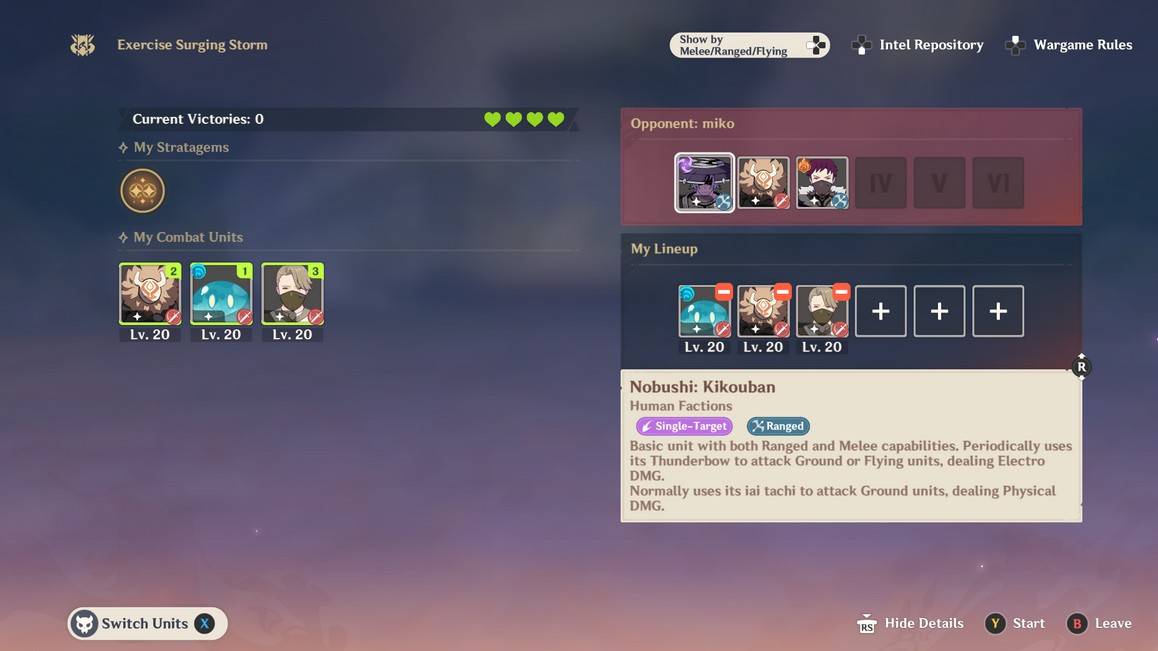
Изучите состав противника и скорректируйте свой, используя диаграмму в правом нижнем углу. Изменение состава требует очков подкрепления, поэтому тщательно продумывайте стратегию.
Типы юнитов:
- Ближний бой: Высокое поглощение урона, низкая скорость.
- Дальний бой: Атаки на дальние дистанции, мало здоровья.
- Урон по площади: Наносит урон группам юнитов.
- Полет: Уклоняется от наземных атак, имеет иммунитет к определенным типам урона.

Повышайте уровень юнитов, выбирая их повторно; обновляйте юниты и стратегемы для получения лучших вариантов. Реакции стихий функционируют так же, как и в обычном мире. Даже проигрыши приносят в качестве награды медали Wargame; победы приносят больше медалей.
Награды
Награды включают в себя Примогемы, Остроумие героя, Материалы для талантов персонажей и многое другое. В приведенной ниже таблице подробно описаны награды, основанные на накопленных медалях Wargame:
| **Требование** | **Награда за медали** |
| Всего 400 медалей Wargame | 40x Примогем, 2x Цепи гладиатора-одуванчика, 20 000x Мора |
| 800 медалей Total Wargame | 40x Примогем, 2x Обломки города Декарабиана, 20 000x Мора |
| 1200 Total Wargame Медали | 40x Примогем, 2 Треснутый зуб северного волка, 20 000 Мора |
| 1600 медалей Total Wargame | 40 Примогем, 2 Цепи гладиатора-одуванчика, 20 000 Мора |
| 2000 медалей Total Wargame | 40x Примогем, 2x Обломки города Декарабиана, 20 000x Мора |
| 2400 Total Wargame Медали | 40x Примогем, 2 Треснутый зуб северного волка, 20 000 Мора |
| 2800 медалей Total Wargame | 40 Примогем, 2 Цепи гладиатора-одуванчика, 20 000 Мора |
| 3200 медалей Total Wargame | 40x Примогем, 2x Обломки города Декарабиана, 20 000x Мора |
| 3600 Total Wargame Медали | 40x Примогем, 2x Треснутый зуб северного волка, 20 000x Мора |
| 4000 медалей Total Wargame | 40x Примогем, 2x Геройское остроумие, 20000x Мора |
| **Требование** | **Награды за испытания** |
| Победы в 3 раунде (одиночная военная игра) | 20x Примогем, 2x Путеводитель по свободе, 3x Мистическое улучшение Руда |
| Победы в 5 раундах (одиночная военная игра) | 2x Остроумие героя, 3x Руда мистического улучшения |
| Победы в 7 раундах ( одиночный варгейм) | 2x Освящающее помазание, 3x Мистическое улучшение Руда |
| 3 Боевые отряды 2-го ранга (улучшение) | 2x Руководство по сопротивлению, 3x Руда мистического улучшения |
| 6 ранг 2 боевых отряда (улучшение) | 2x Геройская сообразительность, 3x Руда мистического улучшения |
| 12 Боевые отряды 2-го ранга (улучшение) | 2x Освящающее помазание, 3x Руда мистического улучшения |
| 1 Боевой отряд 3-го ранга (улучшение) | 2x героя Остроумие, 3 руды мистического улучшения |
| 3 Боевые отряды 3-го ранга (улучшение) | 2x Освящающее помазание, 3 руды мистического улучшения |
| 3 боевых отряда элитного класса (рисунок) | 2x Руководство по балладе, 3x Руда мистических улучшений |
| 6 боевых юнитов элитного класса (рисунок) | 2x Геройское остроумие, 3x Руда мистического улучшения |
| 12 Элитный класс Боевые отряды (чертеж) | 2x Освящающее помазание, 3x Руда мистического улучшения |
| 1 Боевой отряд класса Высший класс (чертеж) | 2x Геройское остроумие, 3 руды мистического улучшения |
| 2 Боевые отряды класса Apex (чертеж) | 2x Геройская остроумие, 3x Руда мистического улучшения |
| 4 Боевые отряды класса Apex (чертеж) | 2x Освящающее помазание, 3х мистическое улучшение Руда |
Событие «Упражнение «Нарастающий шторм»» проходит с 18 по 30 декабря (3:59 по серверному времени) в Genshin Impact версии 5.2. Получите награды до истечения срока.
Welcome to the Destiny Rising Gacha Guide – How Summons, Pity, and Rate-Up Work! Whether you're new to gacha systems or a returning player looking to optimize your summoning strategy, this guide breaks down everything you need to know to maximize your chances, avoid burnout, and get your dream characters (or weapons) efficiently.
🌟 What Is Destiny Rising?
Destiny Rising is a gacha RPG (RPG with randomized character/weapon pulls) where players collect powerful units (heroes) and weapons to build strong teams, progress through story content, and compete in events.
The core gameplay loop revolves around summoning (gacha) to obtain 4★ and 5★ characters and weapons.
🔑 1. How the Gacha System Works
🎯 Summon Types
There are typically three main summon types:
Standard Summon (Main Banner) – For 5★ characters and weapons.
Character Rate-Up Banner – A featured 5★ character (e.g., "Caelum the Radiant") has a higher chance to appear (e.g., 2x base rate).
Weapon Rate-Up Banner – Features a 5★ weapon (e.g., "Soulflame Longsword") with increased spawn rate.
💡 Pro Tip: Always use Rate-Up Banners when you want a specific 5★ character or weapon. The odds are significantly better.
🎲 2. Summon Mechanics Explained
✅ Base Rates (Approximate – Varies by Game)
Pull Type
Base Rate (Est.)
5★ Character
0.6%
5★ Weapon
0.6%
4★ Character
5.1%
4★ Weapon
5.1%
3★ (Common)
89.2%
⚠️ Important: These are base rates. The actual chance increases due to pity mechanics.
🔁 3. Pity System – Your Best Friend
The pity system ensures you won’t go forever without a 5★. Here’s how it works:
🎯 5★ Pity (Guaranteed 5★)
After 90 summons, you are guaranteed a 5★.
The 90th summon is always 5★.
You cannot get a 5★ before 90 if you haven’t had one yet.
🔄 Reset: Pity is reset when you get a 5★. So if you pull a 5★ on summon #75, your next pity counter starts from 0.
🌟 5★ Pity on Rate-Up Characters
On a Rate-Up Banner, you get a higher chance to pull the featured 5★.
After 90 summons, you get a 100% guaranteed 5★, and if you haven’t pulled the featured 5★, you might get it as a "pity" 5★.
🎯 Rate-Up Pity Bonus: In many gacha systems, if you haven’t pulled the featured 5★ character, on your 90th summon, you’re guaranteed to get that specific character (not random). This is called "Featured 5★ Pity".
⚠️ Note: This varies by game. Always check the official Banner Details to confirm.
🎉 4. How to Use Rate-Up Banners Smartly
✅ When to Summon on a Rate-Up Banner
You want the featured 5★ (e.g., a 5★ healer, DPS, or tank).
You’ve already pulled a 5★ character and want a better one.
You're saving up for a full team build.
❌ When to Avoid
Don’t waste summons if you already have the featured 5★.
Don’t spend money if you don’t like the banner theme (no reward = no return).
Avoid pulling on a non-rate-up banner unless you’re okay with a random 5★.
💡 Best Practice: Use 0–89 summons on rate-up banners to increase your chance of getting the featured 5★. Then, if you miss it, wait for pity on a new banner.
📊 5. Summoning Strategies (Pro Tips)
🛠️ 1. Save for Pity
Never spend money on a single summon with no pity.
Wait until 70–80 summons to start spending, so you’re close to 90 and less likely to "waste" a pull.
🛠️ 2. Use Gacha Coins (Free/Event) Wisely
Free gacha coins (from login, events, quests) are better spent on rate-up banners.
Do not use them on non-rate-up banners unless you’re okay with a random 5★.
🛠️ 3. Track Your Pity
Use a gacha tracker app (e.g., Gacha Tracker, Genshin Impact Gacha Simulator) to log your pulls.
Know your current pity, rate-up character, and next guaranteed 5★.
🛠️ 4. Double-Check Banner Details
Look for:
Featured 5★ character (on a rate-up banner).
Pity counter reset on new banners.
Special summon items (e.g., "Crown of Destiny" – boosts 5★ rate on that banner).
❓ Common Questions
🔹 Q: Can I get a 5★ before 90 summons?
Yes – but it’s random and not guaranteed.
🔹 Q: Is the featured 5★ guaranteed on 90th summon?
Only if you’re on a rate-up banner and haven’t pulled it yet. Many games use 100% featured 5★ at 90.
🔹 Q: Should I keep summoning if I already have a 5★?
Yes – if you’re aiming for a specific 5★, or want to upgrade to 5★ version (e.g., 5★ version of a 4★ character).
🔹 Q: How long until I get a 5★ if I keep summoning?
Guaranteed by 90 – so always plan your gacha budget around that.
🧠 Final Tips
✅ Always use rate-up banners when you want a 5★.
✅ Track your pity – don’t rely on memory.
✅ Don’t spend all your coins on one banner – save for when you're close to 90.
✅ Wait for a featured 5★ if you’re trying to build a team.
✅ Avoid FOMO – you’ll get your dream character eventually.
🌈 Summary
Feature
Key Info
90-Pull Pity
Guaranteed 5★ on 90th summon
Rate-Up Banner
Better chance at featured 5★ (often 2x)
Pity on Banner
Often guarantees the featured 5★ at 90
Best Strategy
Use rate-up banners, track pity, wait for 90
🎯 Remember: Gacha is about patience and planning. With the right strategy, you’ll get your dream character – and maybe even a legendary 5★ weapon.
Keep summoning, keep hoping, and may the pity be ever in your favor!
🔔 For the latest banner info, check the official Destiny Rising website or in-game gacha section. Always read the rules before summoning!
Got a question about a specific character or weapon? Drop it below and I’ll help you plan your next summon! 😊