
Schalten Sie die Fang-Schrotflinte des Jägers in Destiny 2 frei: Eine umfassende Anleitung
Das neueste Update von Destiny 2 führt aufregende neue Waffen und Rüstungen ein. In dieser Anleitung erfahren Sie, wie Sie die mächtige Slayer's Fang-Schrotflinte erwerben.
Inhaltsverzeichnis
Erhalt der Fangzahn-Schrotflinte des Jägers in Destiny 2Slayer's Fang-Vorteile Erhalt der Fangzahn-Schrotflinte des Jägers in Destiny 2
Die Slayer's Fang-Schrotflinte erhält man durch den Abschluss der Kell's Fall-Mission in Destiny 2. Diese Mission bildet den krönenden Abschluss von Episode Revenant. Wenn Sie Kell's Fall erfolgreich abschließen, werden Sie mit dem Fangzahn des Jägers belohnt. Sie können die Mission wiederholen, um verbesserte Versionen zu erhalten und mit verschiedenen Vorteilskombinationen zu experimentieren.
Für Spieler, die zu Destiny 2 zurückkehren, suchen Sie die Questreihe „Episode Revenant“ auf Ihrer Director-Karte. Die Ziele sind klar und werden Sie zur letzten Kell's Fall-Mission führen.
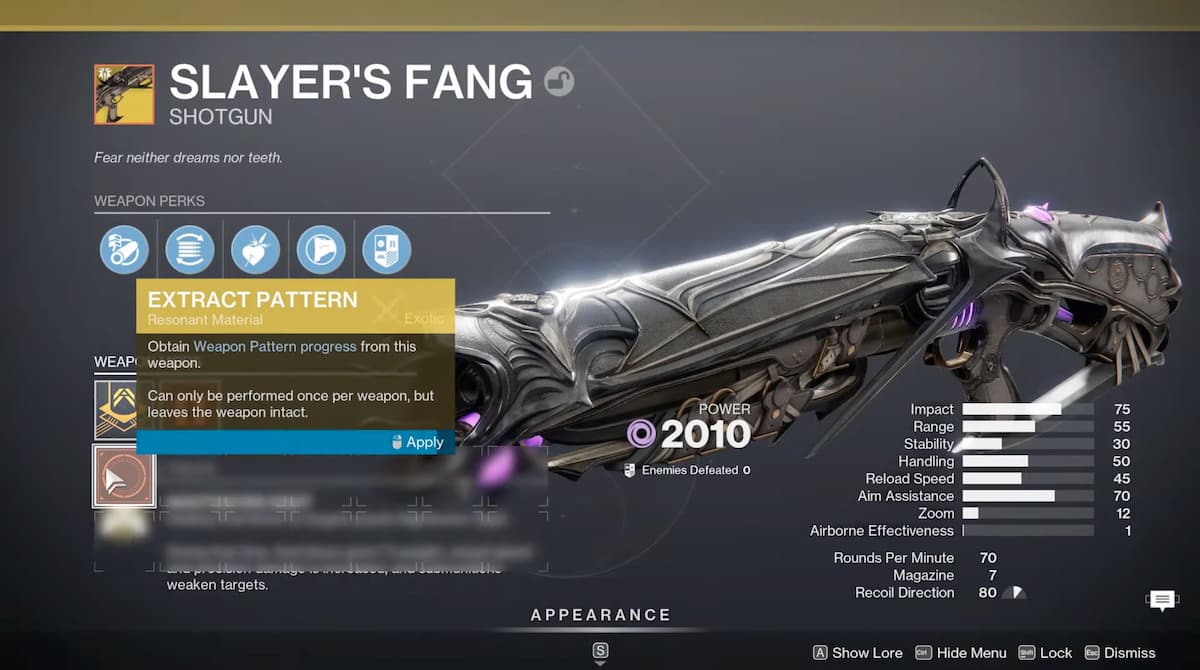
Denken Sie beim Erhalt Ihres ersten Jägerfangs daran, auch das Waffenmuster für die spätere Herstellung zu erhalten.
Slayer's Fang-Vorteile
Diese exotische Schrotflinte verfügt über einen intrinsischen Vorteil und eine einzigartige Eigenschaft:
| Perk | Effect |
|---|---|
| Nightsworn Sight (Intrinsic) | Final blows activate Nightsworn Sight. While active, final blows grant Truesight, increased reload speed and precision damage, and submunitions weaken enemies. |
| Heart Piercer (Unique Trait) | Shots split into submunitions on impact, highly effective against Overload Champions. |
Diese Vorteile machen die Slayer's Fang zu einer herausragenden Schrotflinte, deren Kraft und einzigartige Mechanik sie zu einer wertvollen Ergänzung jedes Arsenals machen. Auch ohne die Suche nach Katalysatoren wird der Erwerb der Basiswaffe dringend empfohlen.
Damit ist unser Leitfaden zum Erhalt des Fangzahns des Jägers in Destiny 2 abgeschlossen. Weitere Tipps und Strategien für Destiny 2, einschließlich Informationen zur Kompassrose, finden Sie in The Escapist.
Welcome to the Destiny Rising Gacha Guide – your complete breakdown of how the gacha system works, including summons, pity mechanics, rate-ups, and tips to maximize your chances of pulling the best characters. Whether you're a new player or looking to optimize your gacha strategy, this guide will help you make smarter choices.
🔮 1. Understanding the Gacha System in Destiny Rising
Destiny Rising uses a standard gacha model with two main types of summons:
Standard Summon (100% Weapon/Character gacha)
Special Summon (Rate-Up Events)
All summons are randomized, and the outcome depends on pity mechanics, rate-up banners, and character/weapon rarity tiers.
🎯 2. Character & Weapon Rarity Tiers
★★★ (3-star) – Common (e.g., base weapons, filler characters)
★★★★ (4-star) – Rare (strong mid-tier units, good for early-game progression)
★★★★★ (5-star) – Epic (Legendary characters & weapons – the main goal)
💡 Note: 5-star characters and weapons are the only ones that can be fully upgraded and are essential for endgame content.
🎁 3. How Summons Work (Pity & Guaranteed Pulls)
The gacha uses a pity system to ensure fairness and prevent "bad luck" streaks.
✅ Pity Mechanics:
Pity Count: Tracks how many summons you've made since your last 5-star pull.
100% Guaranteed 5-Star: After 90 failed summons, your 100th summon is guaranteed a 5-star.
5-Star Rate-Up: During a rate-up event, if you pull a 5-star, it will always be the featured character/weapon.
No Pity on 5-Star: Once you pull a 5-star, your pity counter resets.
⚠️ Important: Your first 5-star pull is guaranteed to be a random 5-star, not necessarily the rate-up.
🎇 4. Rate-Up Events (Your Best Opportunity!)
Rate-Up events are limited-time banners that increase the drop rate for a specific 5-star character or weapon.
🔥 Rate-Up Banner Mechanics:
Increased 5-Star Rate: During a rate-up, the chance to pull the featured 5-star is significantly higher than the standard 5-star rate.
Guaranteed Rate-Up: If you don’t get the featured 5-star within 90 summons, the 100th summon is guaranteed to be the rate-up character/weapon (if on a rate-up banner).
No Guaranteed 5-Star on Rate-Up: You still need to wait 90 summons for a 5-star, but if you get one, it's 100% the featured one.
✅ Pro Tip: Always save your summons for rate-up banners. Pulling on a non-rate-up banner gives you a lower chance to get the top-tier character you want.
🛠️ 5. Summoning Strategies (Maximize Your Odds)
🎯 Best Practices:
Wait for Rate-Up Banners
Most 5-star characters are featured on limited-time banners.
Only summon during these events to maximize your chances.
Use "Pity Counter" to Plan
If you’re 90+ summons away from a 5-star, you’re "in the clear" – you’re guaranteed a 5-star on the 100th.
Use this to plan your spending (e.g., save currency for a 100-pull if you're close).
10x Summon = 100 Pulls (Costs 1000 Gems)
10x summon gives you 100 pulls in one go – great for hitting pity or ending a long streak.
Avoid Random Pulls on Non-Rate-Up Banners
The odds of getting your desired 5-star are much lower when not on a rate-up.
Track Your Pity (Use a Gacha Tracker App)
Many players use tools like Gacha Tracker, Gacha Guide, or Spreadsheet to log summons and plan.
🎁 6. Free & Bonus Summon Tips
Daily Login Rewards: Often include free 10x summons (check the event calendar).
Event Milestones: Completing quests can earn you free gacha tickets or currency.
New Player Events: First 30 days often include 1000+ free summons – use them wisely!
Anniversary/Seasonal Events: Great for getting free 5-star characters or pity resets.
💡 Pro Tip: Use free summons first on rate-up banners to maximize value.
🎮 7. Who Should You Pull?
Character Type
Best For
5-star Character (Rate-Up)
Endgame content, story, visuals, and team synergy
4-star Character
Early/mid-game filler, good for progression
5-star Weapon
Boosts damage and abilities of a 5-star character (e.g., "Soulcleaver" for DPS)
🔥 Golden Rule: Only pull a 5-star if it fits your team or fills a major role (e.g., main DPS, healer, tank).
📊 Summary: Your Gacha Checklist
✅ Wait for a rate-up banner before spending on summons
✅ Use 10x summons to reach pity (90–100 pulls)
✅ Save currency for when your pity is high (90+ pulls)
✅ Track your pulls using a gacha tracker app
✅ Use free summons on rate-up banners first
✅ Only pull 5-stars you actually need for team composition
🌟 Final Advice
Don’t overspend on gacha – it’s a game, not a life investment.
Be patient – the pity system ensures you’ll get a 5-star eventually.
Enjoy the journey – many players end up with amazing characters after 100–200 summons.
🎯 Pro Tip: If you're aiming for a specific 5-star, wait for the banner. The game is designed so you’ll get it eventually — just plan smart.
✨ Remember: In Destiny Rising, your destiny isn’t just luck — it’s strategy.
Good luck, Commander. The stars await your summon.
🌌 Keep rising.