In *Honkai: Star Rail*, the Eternal Holy City Okhema is the first map you'll unlock upon arriving in Amphoreus. This map is divided into two key areas: Kephale Plaza and Marmoreal Palace. After following Black Swan's advice in Penacony, your latest Trailblaze Mission takes you to a new planet. Unfortunately, things go awry when your train coach is attacked, scattering your team across an unknown territory. Thankfully, Phainon comes to your aid, guiding you to the "Eternal Holy City" Okhema and introducing you to some pivotal characters in Amphoreus.
Eternal Holy City Okhema Treasure Locations in Honkai: Star Rail

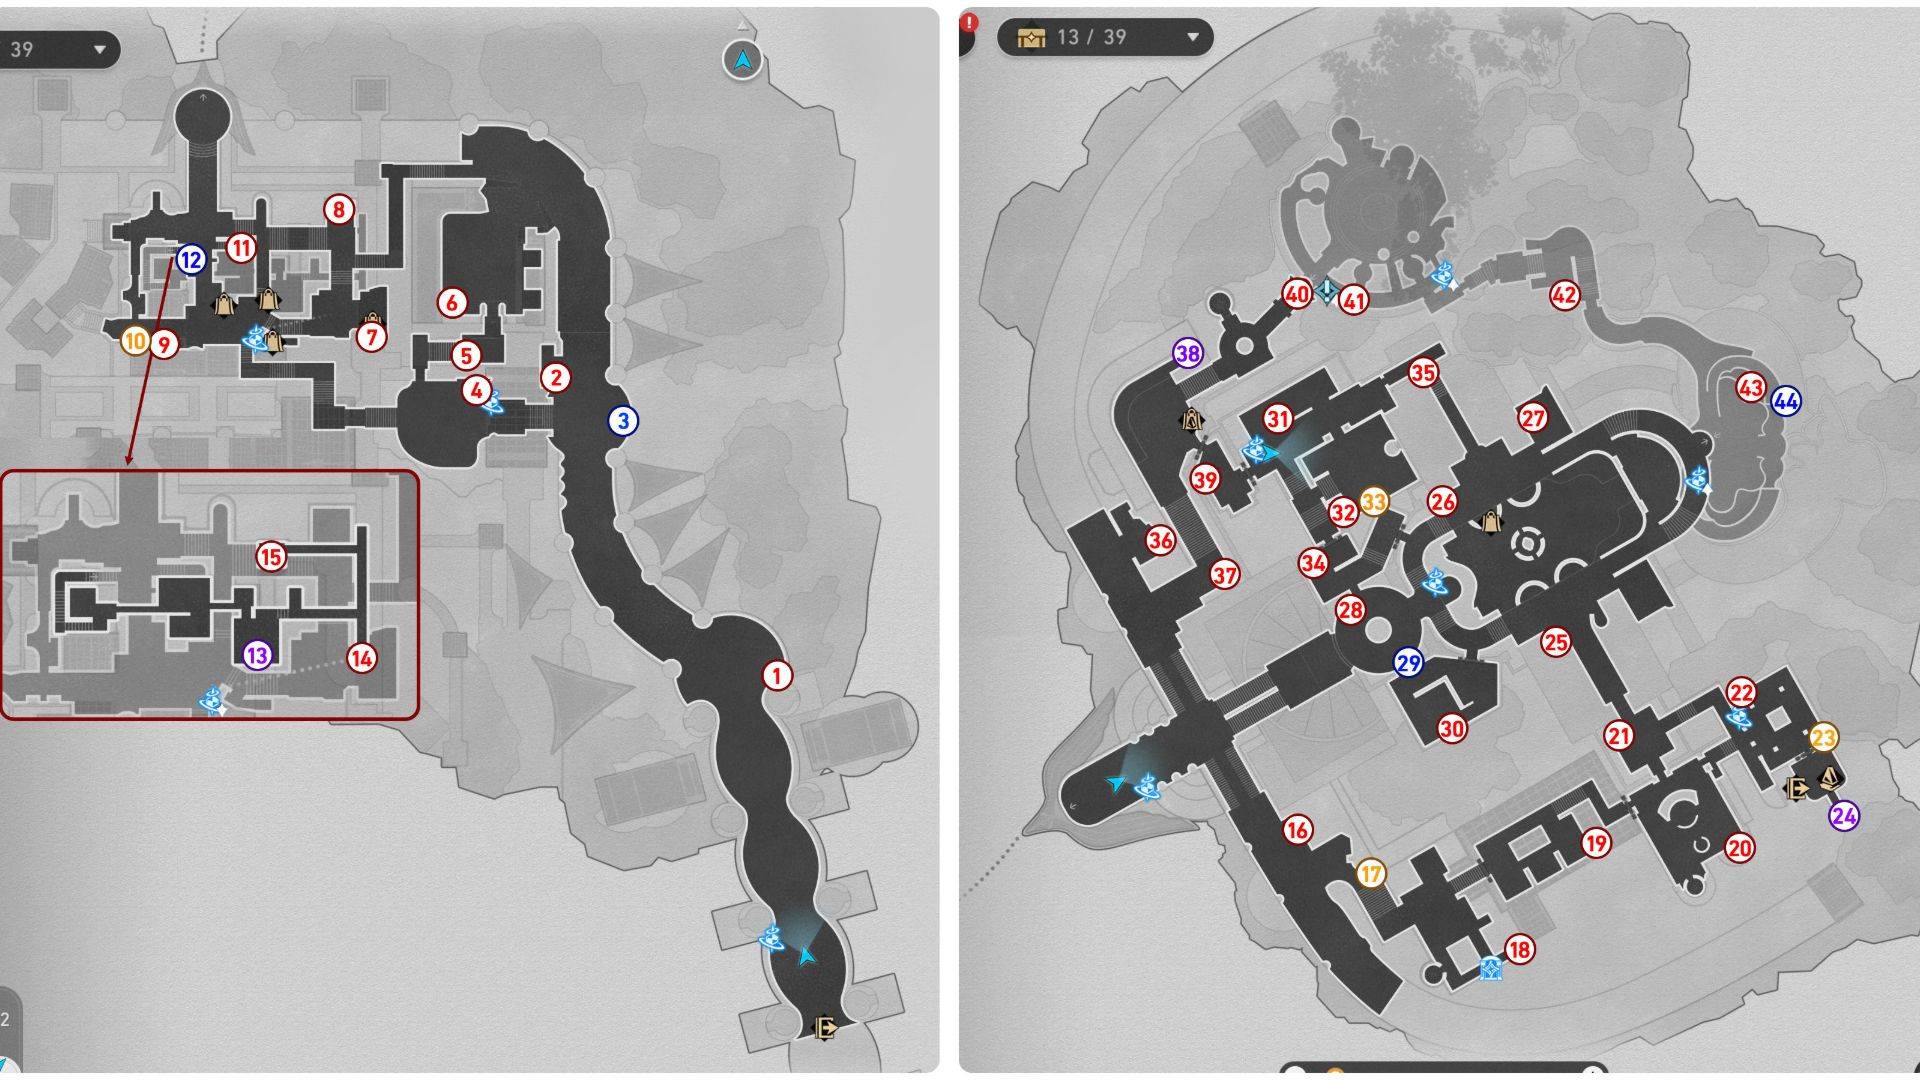
In the Eternal Holy City Okhema, you'll discover a total of 33 Treasure Chests, 4 Flying Spears, 3 Spirithiefs, and 4 Golden Scapegoats. Bringing 'The Herta' along for the journey is highly recommended, as her Technique can mark several unclaimed treasure chests on your map. Additionally, Topaz can be quite beneficial, as her companion Numby will alert and guide you to nearby chests.
The map uses color-coded markers: blue for Golden Short Spears, purple for Spirithiefs, and yellow for Golden Scapegoats.
- 1. Start at Path of Parting Space Anchor, head north to the spacious area, and look to the east for a treasure chest.
- 2. Follow the path to Kephale Plaza, and when you see the Space Anchor, walk past it and look east. The treasure chest is near the rest area.
- 3. From your previous position, look southeast towards the breakable shield with an impaled spear. Rewind time and follow the Golden Short Spear until it spawns a treasure chest.
- 4. Teleport to the Kephale Plaza Space Anchor, where you'll find a treasure chest right beside it.
- 5. Walk north through the small hallway, and you'll spot a Basic Treasure near the crates.
- 6. Continue along the hallway towards a plaza. Look to the west for a treasure chest beside a dinosaur.
- 7. Use the Marmoreal Market Space Anchor and head east to find a treasure chest inside the blacksmith shop called Chartonus Smithy.
- 8. Keep going north, and you'll find a Basic Treasure at the end of the road.
- 9. Return to Marmoreal Market Space Anchor and head far west until you see two breakable shields. Break them to uncover the treasure chest behind them.
- 10. Next to the previous chest, there's a new Golden Scapegoat puzzle. Complete it by guiding the gold goat to light up the altar and unlock the chest.
- 11. Go back to the middle of the market and walk north to find two small steps on the left and right sides. Climb the steps on the right side first for a Basic Treasure.
- 12. Descend the stairs and walk to the opposite side to see a breakable shield with a spear. Break the shield, fix the Golden Short Spear, and follow it to the second floor.
- 13. The flying spear should stop near the ritual fountain. From there, head east to walk on the rooftop. Follow the path until you see a treasure chest on the rooftop’s edge. When claiming it, a Spirithief will appear and steal it. Use Oronyx’s power to rewind the fissures and retrieve the treasure from the Spirithief.
- 14. The next chest can be found at the end of the southern road.
- 15. After grabbing the previous chest, head northwest for the last treasure chest on the rooftops.
- 16. Use the Marmoreal Palace Space Anchor and head southeast towards the Dromas Stop beside the road. The treasure chest is right behind a breakable shield.
- 17. Go to the stairs on the east, where you'll find a Golden Scapegoat puzzle. Solve it for another Basic Treasure chest.
- 18. Follow the road upwards toward the small bathing area. The chest is at the corner near a lounge chair.
- 19. Walk northeast towards a room filled with scrolls. The treasure chest is near the last cabinet.
- 20. Continue northeast to another bathing area. The treasure chest is beside the long table.
- 21. Look at the door leading north, and you'll find a Basic Treasure inside the room with a bard and a group of listeners.
- 22. Warp to the Hall of Respite Space Anchor and turn around to see the treasure chest just beside the space anchor.
- 23. Walk to the opposite side of the room and complete the Golden Scapegoat puzzle to unlock the treasure.
- 24. Enter the private chamber beside the previous Golden Scapegoat puzzle and walk to the end of the balcony to find the Spirithief’s treasure chest.
- 25. Head to the Overflowing Bath Space Anchor, walk to the south part of the bathroom, and retrieve the treasure chest from the water.
- 26. Go to the opposite side of the room, where another chest is also submerged.
- 27. From the previous spot, walk northeast to the swimming pool with a Dromas. The treasure chest is in the water beside the animal.
- 28. Return to the Overflowing Bath Space Anchor and walk through the waterfall to the reception area. A treasure chest can be found just beside the chair.
- 29. Walk to the opposite side of the room and destroy the breakable shield. Fix the Golden Short Spear and follow it to retrieve a chest.
- 30. While following the flying spear, you'll enter the back room, where a treasure chest sits on top of a box. Don't miss it before continuing after the spear.
- 31. Use the Court of Seasons Space Anchor, and you can spot a treasure chest near the wall.
- 32. Head to the massage room in the south, where a Basic Treasure can be seen near the beds.
- 33. In the same room as the previous treasure, there's a Golden Scapegoat puzzle. Complete it to unlock the hidden treasure.
- 34. Leave the massage room and walk south to find a treasure chest inside the storage room.
- 35. Return to the Court of Seasons Space Anchor one last time and head northeast to the corridor for another treasure chest.
- 36. Now, go to the Marmoreal Palace Space Anchor and head north towards the crate storage area. The treasure chest is near a dinosaur.
- 37. Continue upwards, and you'll see the next treasure chest near a group of NPCs.
- 38. Follow the path leading to a banquet and walk to the left side of the stairs. The treasure chest is beside a cushion on top of the partition.
- 39. From the previous spot, enter the room in the south and retrieve the treasure chest behind the breakable shield.
- 40. Leave the room and head to the elevator on the north, but don't use it yet. Instead, go to the back of the elevator for another hidden treasure chest.
- 41. Take the elevator to the second floor and head east towards the Basic Treasure near Flying Amphora in front of the cabinet.
- 42. Continue following the path to the Garden of Life Space Anchor and head east to the small private room to find another treasure chest.
- 43. Teleport to the Hero’s Bath Space Anchor and head to the pool in the north for a treasure chest submerged in water.
- 44. Lastly, use the swirling pillar to climb upwards, and you'll find a breakable shield with a flying spear. Fix the Golden Short Spear and follow it to unlock the last treasure chest in Okhema.
Collecting treasure chests in *Honkai: Star Rail* is a prime method for acquiring Stellar Jades. With the new area introduced in version 3.0, diligent Trailblazers who explore Amphoreus thoroughly will amass a significant amount of Jades.


